dockerfile保留字
[toc]
参数讲解
from:基础镜像,一般来自哪个(继承)maintainer:镜像维护者的姓名和邮箱地址run:容器构建时候执行的命令(docker build)shell格式exec格式
expose:当前容器对外暴露的端口workdir:指定创建容器后,终端 默认登陆进来的工作目录user:指定镜像以什么样的用户进行(一般不用,默认是root)env:用来在构建镜像过程中设置环境变量ENV CATALINA_HOME /usr/local/tomcat ENV PATH $CATALINA_HOME/bin:$PATH RUN mkdir -p "$CATALINA_HOME" WORKDIR $CATALINA_HOMEadd:将宿主目录下的文件拷贝到镜像且自动处理URL和解压的tar压缩包(一般使用copy不使用add)copy:(类似于add),将构建的文件、目录复制到新的一层镜像内·
COPY src dest·
COPY ["src", "dest"]·
<src源路径>:源文件或者源目录·
<dest目标路径>:容器内的指定路径,该路径不用事先建好,路径不存在的话,会自动创建。volume:容器卷,相当于-vcmd:启动容器后需要做的事情- 类似于
run,也支持shell或者exec dockerfile中可以用多个cmd指令,但 只有最后一个生效,cmd会被docker run之后的参数替换- 可以想到是
bin/bash,catalina.sh将其覆盖
EXPOSE 8080 CMD ["catalina.sh", "run"]- 类似于
entrypoint:也是用来指定一个容器启动时要运行的命令,看后面警告信息~- 类似于
cmd指令,可以和cmd一起用
- 类似于
CMD 和 RUN 区别
CMD是docker run时运行 ⚠️RUN是docker build时运行 ⚠️
ENTRYPOINT 区别 CMD 会被 Dockerfile 后面参数覆盖,ENTRYPOINT 不会,而且这些参数会被当作参数送给 ENTRYPOINT 指令指定的程序
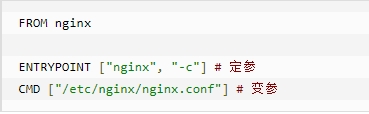
⚡组合使用,我们构建 nginx:test镜像:
FORM nginx
ENTRYPOINT ["nginx", "-c"] # 定参
CMD ["/etc/nginx/nginx.conf"] #变参
| 时否传参 | 按照dockerfile编写执行 | 传参运行 |
|---|---|---|
docker 命令 | docke run nginx:test | docker run nginx:test -c /etc/nginx/new.conf |
| 衍生出的实际命令 | nginx -c /etc/nginx/nginx.conf | nginx -c /etc/nginx/new.conf |
一些自己的📜 对上面的解释
我们在使用 RUN 的时候可以想象为:
RUN ["./test.php" , "dev", "offline"] 等价于 RUN ./test.php dev offline
为什么需要设置环境变量?
ENV MY_PATH /usr/mytest
环境变量也是可以和 RUN 一起用的,或者是 工作目录:
RUN makir -p "MY_PATH"
WORKDIR /MY_PATH
就是方便使用而已~
关于 ADD 和 COPY 我比较倾向于 ADD ,它更强大。能处理 URL 类似于 wget,自动帮你下载远程文件。
Dockerfile 可以有多个 CMD 指令,但是只有最后一个生效,CMD 会被 docker run 之后的参数替换,如:
docker run -it -p 8080:8080 tomcat /bin/bash
/bin/bash 最后替换了原有 CMD ,此时会出现找不到服务器~
上手
我们以创建一个
dockerfile为例
创建Dockerfile文件,注意一定要是D大写
touch Dockerfile
编写Dockerfile:
💡 注意:除了
FROM语句其他都是非必须的!
FROM aloine
# 指定shell语句运行在哪个路径下
WORKDIR /app
# 将宿主机的文件拷贝到容器app下面
COPY src/ /app
#运行的是shell语句
RUN echo 321 >> 1.txt
#一般执行CMD后就结束了,所以选择的是阻塞式脚本
CMD tail -f 1.txt
运行Dockerfile脚本
-t指定名称.指定当前目录下
docker build -t test .
运行:
docker run test
参考dockerfile
参考tomcat8的dockerfile入门
不管我们远程拉取的热门容器,或者是自己打包的镜像,都需要
dockerfile作为支撑。
- https://github.com/docker-library/tomcat/blob/master/10.0/jdk8/corretto/Dockerfile
# NOTE: THIS DOCKERFILE IS GENERATED VIA "apply-templates.sh"
#
# PLEASE DO NOT EDIT IT DIRECTLY.
#
FROM amazoncorretto:8
# 基础镜像,一般来自哪个
ENV CATALINA_HOME /usr/local/tomcat
ENV PATH $CATALINA_HOME/bin:$PATH
RUN mkdir -p "$CATALINA_HOME"
WORKDIR $CATALINA_HOME
# let "Tomcat Native" live somewhere isolated
ENV TOMCAT_NATIVE_LIBDIR $CATALINA_HOME/native-jni-lib
ENV LD_LIBRARY_PATH ${LD_LIBRARY_PATH:+$LD_LIBRARY_PATH:}$TOMCAT_NATIVE_LIBDIR
# see https://www.apache.org/dist/tomcat/tomcat-10/KEYS
# see also "versions.sh" (https://github.com/docker-library/tomcat/blob/master/versions.sh)
ENV GPG_KEYS A9C5DF4D22E99998D9875A5110C01C5A2F6059E7
ENV TOMCAT_MAJOR 10
ENV TOMCAT_VERSION 10.0.20
ENV TOMCAT_SHA512 53bfdbac2e6af5cca97dc01fffb0428380fbe21d8375f45d015c16a57017ff946fdc555ebad9e9fcbcb97b438c4f6daf3aa39d36ca79fd5a372cfc1a80b7117f
RUN set -eux; \
\
# http://yum.baseurl.org/wiki/YumDB.html
if ! command -v yumdb > /dev/null; then \
yum install -y yum-utils; \
yumdb set reason dep yum-utils; \
fi; \
# a helper function to "yum install" things, but only if they aren't installed (and to set their "reason" to "dep" so "yum autoremove" can purge them for us)
_yum_install_temporary() { ( set -eu +x; \
local pkg todo=''; \
for pkg; do \
if ! rpm --query "$pkg" > /dev/null 2>&1; then \
todo="$todo $pkg"; \
fi; \
done; \
if [ -n "$todo" ]; then \
set -x; \
yum install -y $todo; \
yumdb set reason dep $todo; \
fi; \
) }; \
_yum_install_temporary gzip tar; \
\
ddist() { \
local f="$1"; shift; \
local distFile="$1"; shift; \
local mvnFile="${1:-}"; \
local success=; \
local distUrl=; \
for distUrl in \
# https://issues.apache.org/jira/browse/INFRA-8753?focusedCommentId=14735394#comment-14735394
"https://www.apache.org/dyn/closer.cgi?action=download&filename=$distFile" \
# if the version is outdated (or we're grabbing the .asc file), we might have to pull from the dist/archive :/
"https://downloads.apache.org/$distFile" \
"https://www-us.apache.org/dist/$distFile" \
"https://www.apache.org/dist/$distFile" \
"https://archive.apache.org/dist/$distFile" \
# if all else fails, let's try Maven (https://www.mail-archive.com/users@tomcat.apache.org/msg134940.html; https://mvnrepository.com/artifact/org.apache.tomcat/tomcat; https://repo1.maven.org/maven2/org/apache/tomcat/tomcat/)
${mvnFile:+"https://repo1.maven.org/maven2/org/apache/tomcat/tomcat/$mvnFile"} \
; do \
if curl -fL -o "$f" "$distUrl" && [ -s "$f" ]; then \
success=1; \
break; \
fi; \
done; \
[ -n "$success" ]; \
}; \
\
ddist 'tomcat.tar.gz' "tomcat/tomcat-$TOMCAT_MAJOR/v$TOMCAT_VERSION/bin/apache-tomcat-$TOMCAT_VERSION.tar.gz" "$TOMCAT_VERSION/tomcat-$TOMCAT_VERSION.tar.gz"; \
echo "$TOMCAT_SHA512 *tomcat.tar.gz" | sha512sum --strict --check -; \
ddist 'tomcat.tar.gz.asc' "tomcat/tomcat-$TOMCAT_MAJOR/v$TOMCAT_VERSION/bin/apache-tomcat-$TOMCAT_VERSION.tar.gz.asc" "$TOMCAT_VERSION/tomcat-$TOMCAT_VERSION.tar.gz.asc"; \
export GNUPGHOME="$(mktemp -d)"; \
for key in $GPG_KEYS; do \
gpg --batch --keyserver keyserver.ubuntu.com --recv-keys "$key"; \
done; \
gpg --batch --verify tomcat.tar.gz.asc tomcat.tar.gz; \
tar -xf tomcat.tar.gz --strip-components=1; \
rm bin/*.bat; \
rm tomcat.tar.gz*; \
command -v gpgconf && gpgconf --kill all || :; \
rm -rf "$GNUPGHOME"; \
\
# https://tomcat.apache.org/tomcat-9.0-doc/security-howto.html#Default_web_applications
mv webapps webapps.dist; \
mkdir webapps; \
# we don't delete them completely because they're frankly a pain to get back for users who do want them, and they're generally tiny (~7MB)
\
nativeBuildDir="$(mktemp -d)"; \
tar -xf bin/tomcat-native.tar.gz -C "$nativeBuildDir" --strip-components=1; \
_yum_install_temporary \
apr-devel \
gcc \
make \
openssl11-devel \
; \
( \
export CATALINA_HOME="$PWD"; \
cd "$nativeBuildDir/native"; \
aprConfig="$(command -v apr-1-config)"; \
./configure \
--libdir="$TOMCAT_NATIVE_LIBDIR" \
--prefix="$CATALINA_HOME" \
--with-apr="$aprConfig" \
--with-java-home="$JAVA_HOME" \
--with-ssl=yes \
; \
nproc="$(nproc)"; \
make -j "$nproc"; \
make install; \
); \
rm -rf "$nativeBuildDir"; \
rm bin/tomcat-native.tar.gz; \
\
# mark any explicit dependencies as manually installed
find "$TOMCAT_NATIVE_LIBDIR" -type f -executable -exec ldd '{}' ';' \
| awk '/=>/ && $(NF-1) != "=>" { print $(NF-1) }' \
| xargs -rt readlink -e \
| sort -u \
| xargs -rt rpm --query --whatprovides \
| sort -u \
| tee "$TOMCAT_NATIVE_LIBDIR/.dependencies.txt" \
| xargs -r yumdb set reason user \
; \
\
# clean up anything added temporarily and not later marked as necessary
yum autoremove -y; \
yum clean all; \
rm -rf /var/cache/yum; \
\
# sh removes env vars it doesn't support (ones with periods)
# https://github.com/docker-library/tomcat/issues/77
find ./bin/ -name '*.sh' -exec sed -ri 's|^#!/bin/sh$|#!/usr/bin/env bash|' '{}' +; \
\
# fix permissions (especially for running as non-root)
# https://github.com/docker-library/tomcat/issues/35
chmod -R +rX .; \
chmod 777 logs temp work; \
\
# smoke test
catalina.sh version
# verify Tomcat Native is working properly
RUN set -eux; \
nativeLines="$(catalina.sh configtest 2>&1)"; \
nativeLines="$(echo "$nativeLines" | grep 'Apache Tomcat Native')"; \
nativeLines="$(echo "$nativeLines" | sort -u)"; \
if ! echo "$nativeLines" | grep -E 'INFO: Loaded( APR based)? Apache Tomcat Native library' >&2; then \
echo >&2 "$nativeLines"; \
exit 1; \
fi
EXPOSE 8080
CMD ["catalina.sh", "run"]
补充:
案例如下:假设已通过 Dockerfile 构建了 nginx:test 镜像:
| 是否传参 | 按照dockerfile编写执行 | 传参运行 |
|---|---|---|
| Docker命令 | docker run nginx:test | docker run nginx:test -c /etc/nginx/new.conf |
| 衍生出的实际命令 | nginx -c /etc/nginx/nginx.conf | nginx -c /etc/nginx/new.conf |
ENV MY_PATH /usr/mytest
这个环境变量可以在后续的任何RUN指令中使用,这就如同在命令前面指定了环境变量前缀一样;
也可以在其它指令中直接使用这些环境变量,
比如:WORKDIR $MY_PATH